INSTALLATION INSTRUCTIONS
The installation of the chimney fan is estimated to take an
average of 15 minutes, when installed on a brick chimney or a steel chimney. The
installation time does not include: setting up ladder, lifting fan to the top of
the chimney, cutting back flue tile etc. Only the installation of fiber mat,
mounting brackets, steel chimney adaptor, safety wire, and junction box is
included. Open the carton and remove all packing materials. The standard chimney
fan package includes: chimney fan w. bird screen, 3-4 ft cable in conduit,
weatherproof junction box (not shown), fiber mat, safety wire with anchor,
Installation brackets (set of 4), motor speed control (not shown), Installation
Instructions and a Warranty Registration Card.
Make sure the axial vane turns without making noise or offering
resistance. Also make sure it is in balance.
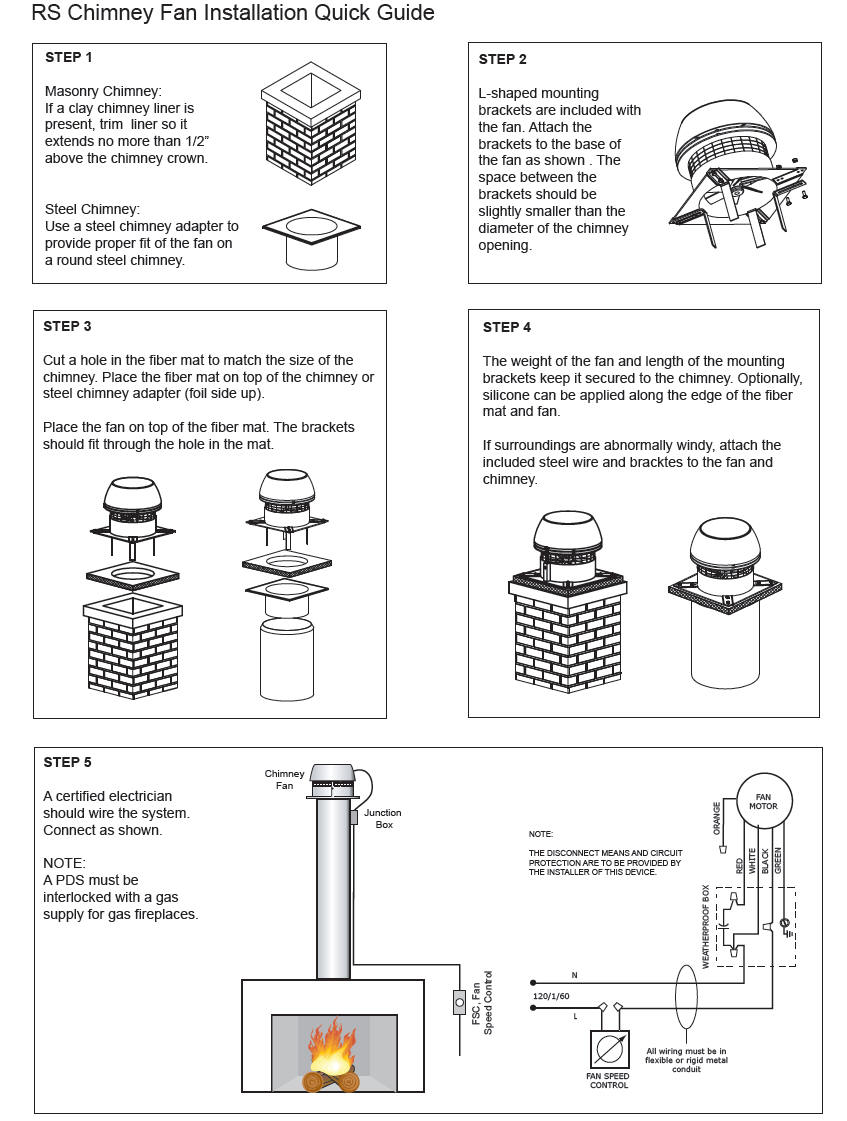
Installation on brick chimney.
The installation procedure is the same whether the flue is round
or rectangular. If a clay tile flue liner is installed, it might stick up a few
inches. Cut it back so it is flush with the chimney crown.
Step1:
Prepare fan location
The installation procedure is the same whether the flue is round
or square. If a clay tile flue liner is installed, it might stick up a few
inches. Cut it back so it is flush with the chimney crown.
Measure the inside diameter of the flue, cut a corresponding
hole in the fiber mat leaving a minimum distance of 3/4" to any side of the
fiber mat.
The aluminum foil on the fiber mat must face upwards (against
fan base).
Step 2:
|
 |
Preparation of fan
Locate the installation brackets in the grooves on the underside
of the fan base using the bolts and nuts supplied, to secure the brackets. Note
that the bolts shall be installed from the bottom side in the two inner holes.
Adjust the final position of the installation brackets ensuring
that there is clearance between the brackets and the flue wall. If the brackets
touch the flue wall, it is likely to create some noise from the vibration.
|
Step 3:
The chimney fan is now ready for installation on the top of the
chimney. Place the fiber mat on the top of the chimney, with the aluminum facing
upwards, and place the fan on the top of the mat.
Step 4:
Decide on the location of the bolt and wall plug (1). Drill a
hole in the stack and secure the safety wire by the bolt and the wall plug. Take
the safety wire through the hole in the fan base and return it to the free clamp
of the wire. Tighten the safety wire slightly (2) and crimp the free clamp to
provide secure anchoring for subsequent safe cleaning and service. Fit the
liquid tight junction box (3) on the outside wall of the chimney stack, but make
sure the conduit is 10-12" away from the fan outlet. Run the installation cable
to the fan speed control/switch and the main electric supply.
Caution:
Under conditions with extremely strong winds constantly surrounding the top of
the chimney, the chimney fan must be secured by steel wires or similar.
Chimney Fan Wiring
Special Applications.
1. High temperature applications.
If the fan is used for applications where the flue gas
temperature exceeds 400°F at the exit point, but does not exceed 650°F, dilution
bolts must be used. Typical situations are chimneys that are only 6-8' high.
Dilution bolts will cause cool air to mix with the warm exhaust gas as they will
lift the fan from the chimney and leave space so the cool air can get in.
The dilution bolts should be installed in the outer holes in the
fan base. The dilution bolts should be adjusted in height, so the flue gas
temperature does not exceed 400°F when discharged through the fan. However, in
order to minimize soot deposits make sure the temperatures is above 320°F. When
using dilution bolts the fan’s actual capacity decreases and you might need a
stronger model. Fiber mat is not required when using dilution bolts.
2. The Flue is Bigger than the Fan Base.
|
If the flue size exceeds the size of the fan base, it is
necessary to alter the top of the chimney by installing a support flange, made
out of stainless steel, as shown.
The support flange must be secured and the hole in the center
must be 12" in diameter.
Note: Using only one flue
can cause problems with flow noise due to high velocities. Chimney fans
operating in tandem should always be of the same size.
|
 |
3. The Flue Pipe is Higher than the Chimney.
In many cases, the chimney is designed so the liner or the
chimney insert sticks several inches up over the chimney top. If it is a few
inches, it’s recommended to install the chimney fan on the top, provided the
pipe will give enough support for the fan. If there’s insufficient support, the
liner or the flue must be cut back, so it is flush with the top of the chimney
and the chimney fan can be installed as described in the previous.
4. Two Flues Servicing One Fireplace
This solution is used by many designers when the fireplace
opening is large, and the total flue opening must be larger than a standard pipe
or liner. By installing two separate flues the builder has accomplished a total
flue opening big enough for the fireplace opening. When sizing a chimney fan for
this kind of application, there are two ways to go about it: One of the flues
must be shut off or disconnected and the chimney fan installed on the open flue,
or A chimney fan should be installed on each flue and operate in tandem.
EXHAUSTO Fans...the
ultimate draft solution.
|